
Everything you need to install Koalab Quote, set it up with your brand and start quoting from your WooCommerce store. Sections marked Pro or Agency need a paid license.
1. Before you start
- Requirements: WordPress 6.4 or later, WooCommerce 8.0 or later and PHP 7.4 or later.
- Who can quote: users who can manage WooCommerce, that is, administrators and shop managers. Your customers never see the quote panel or load its files.
- Language: the plugin is in English and Spanish, and follows your WordPress language.
2. Install Koalab Quote
- In your WordPress, go to Plugins → Add New Plugin.
- Search for Koalab Quote.
- Click Install Now and then Activate.
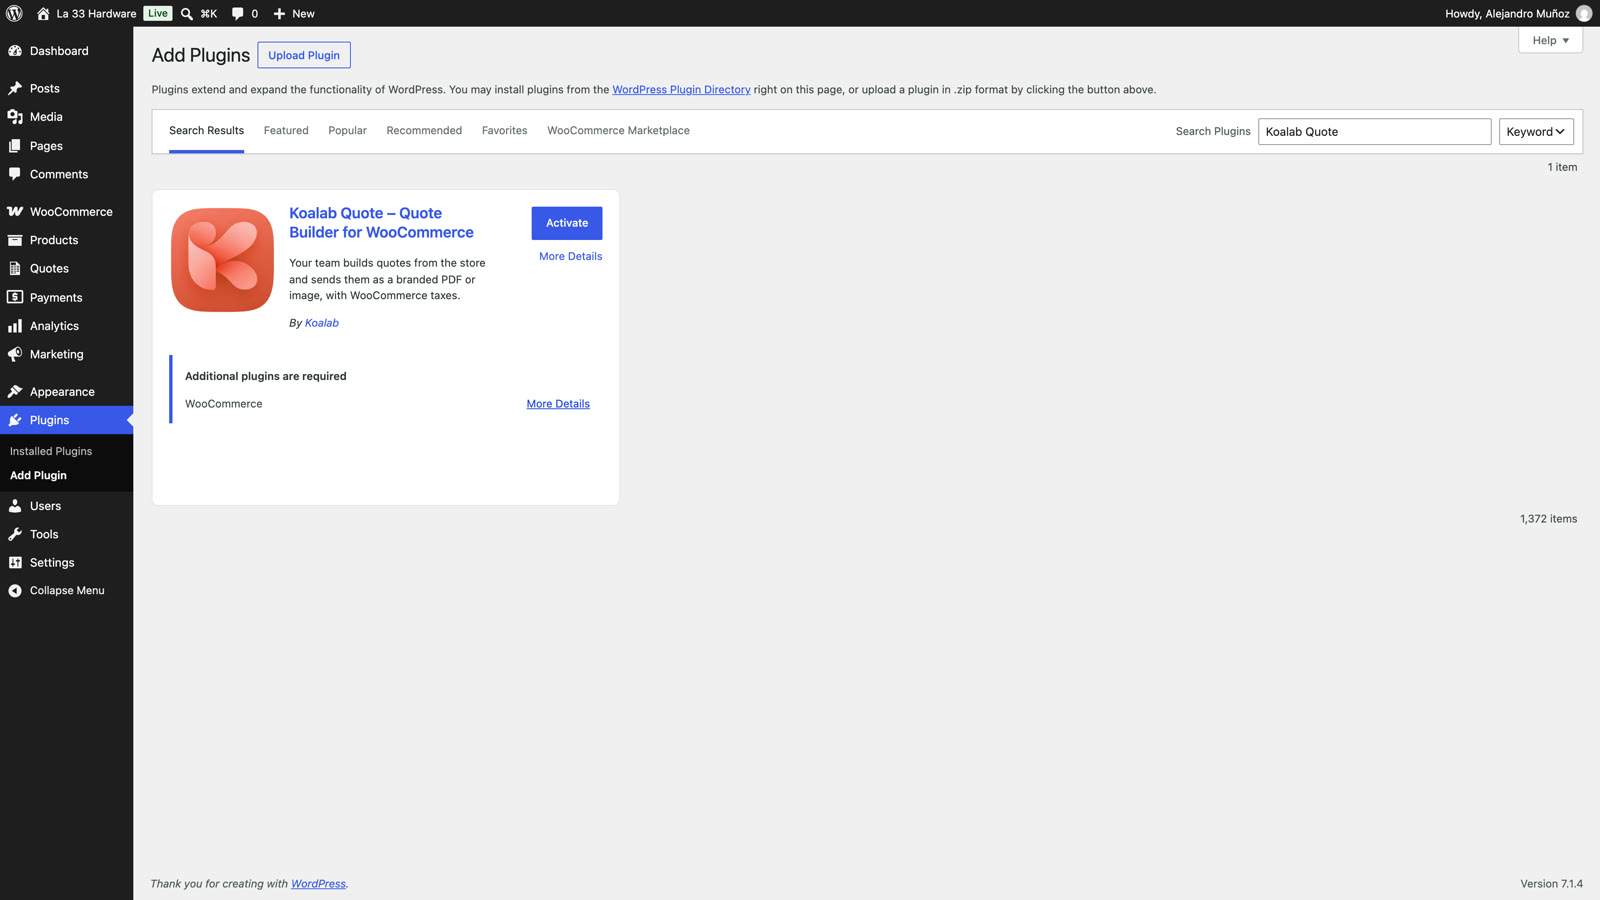
When you activate it, a Freemius screen may ask whether you want security notices and to share basic site data. It's optional: accept or click Skip, and the plugin works the same.
3. Activate the Pro version Pro
When you buy a license at quote.koalab.tech, Freemius emails you your license key and a link to download the Pro version. There are two ways to go:
Option A: from the plugin you already installed
- Go to Plugins → Installed Plugins.
- Under Koalab Quote, click Activate License.
- Paste the key from the email and confirm. Freemius installs the Pro version for you.
Option B: uploading the file
- Download the
.zipfile from the purchase email or from your Freemius account. - In Plugins → Add New Plugin → Upload Plugin, choose the file and install it.
- Activate it and paste your license key when asked.
Your quotes and settings stay in place when you move from the free version to Pro. You can deactivate the license on one site and activate it on another from your Freemius account.
4. Set up your company and the document
All settings are under Quotes → Settings, in tabs.
Company
This is what's printed in the header and footer of every quote: company name, tax ID, address, phone or WhatsApp, email, website, logo and colors (main and accent). This is also where you pick the default template.
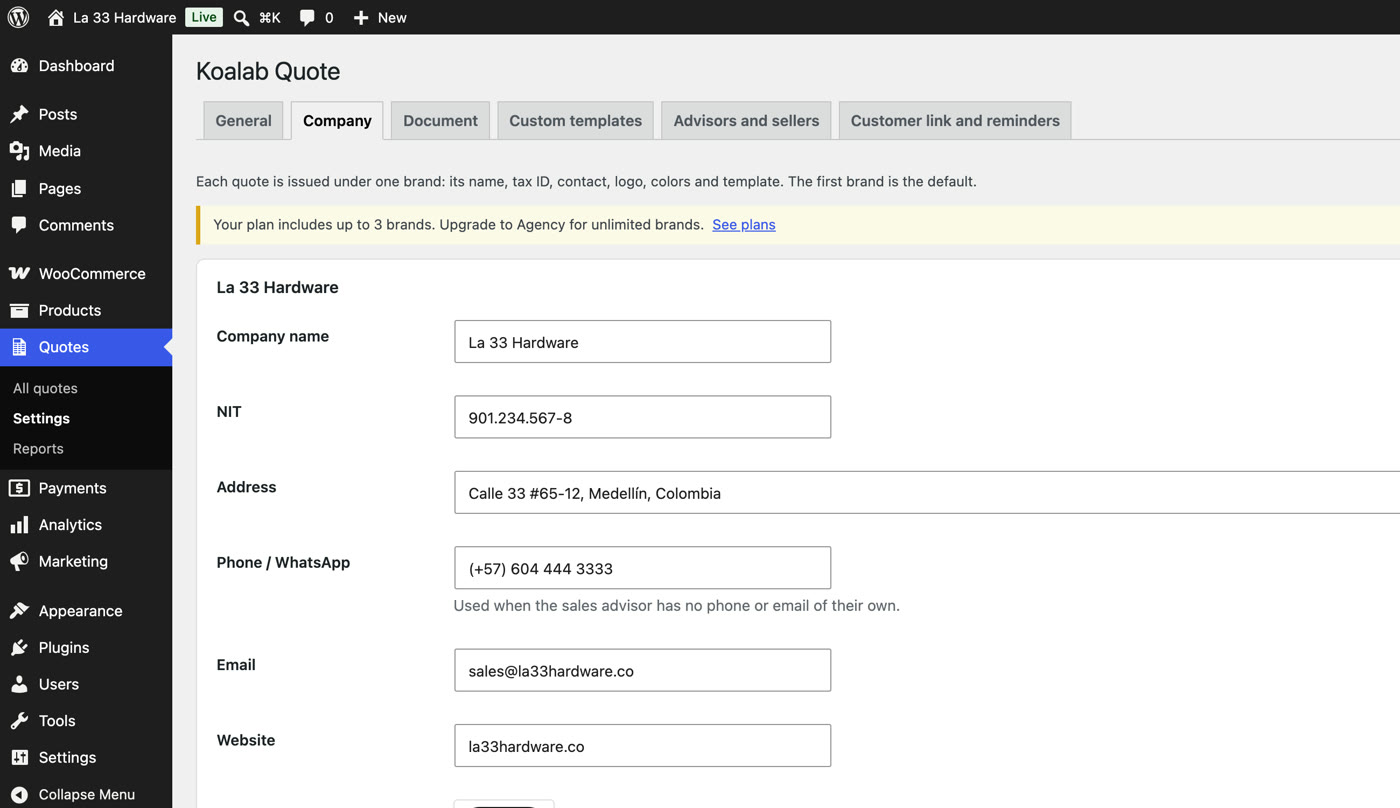
The company phone and email are used when the advisor who quotes has none of their own. If you don't choose a logo, the site logo is used.
General
- Quote number prefix: quotes are numbered PREFIX0001, PREFIX0002… (for example, QT-0001).
- Default validity: how many days a quote is valid. It can be changed on each one.
- Tax ID labels for your company and your customer: NIT, RFC, CUIT, RUT, RUC or whatever your country uses. They're filled in from your store's country.
- Product images and the store price struck through with the savings on new quotes. The struck-through price only shows when you quote below the store price.
- Delete all quotes and settings when the plugin is deleted: leave it off if you don't want to lose your quotes when uninstalling.
Document
- Document title: for example "Quote" or "Business proposal".
- Default terms and conditions: one per line. Editable on each quote.
- Additional block: a fixed block with a title and text, for example your warranty or payment details. Leave it empty to hide it.
- Footer message: for example "Thank you for your business."
Taxes
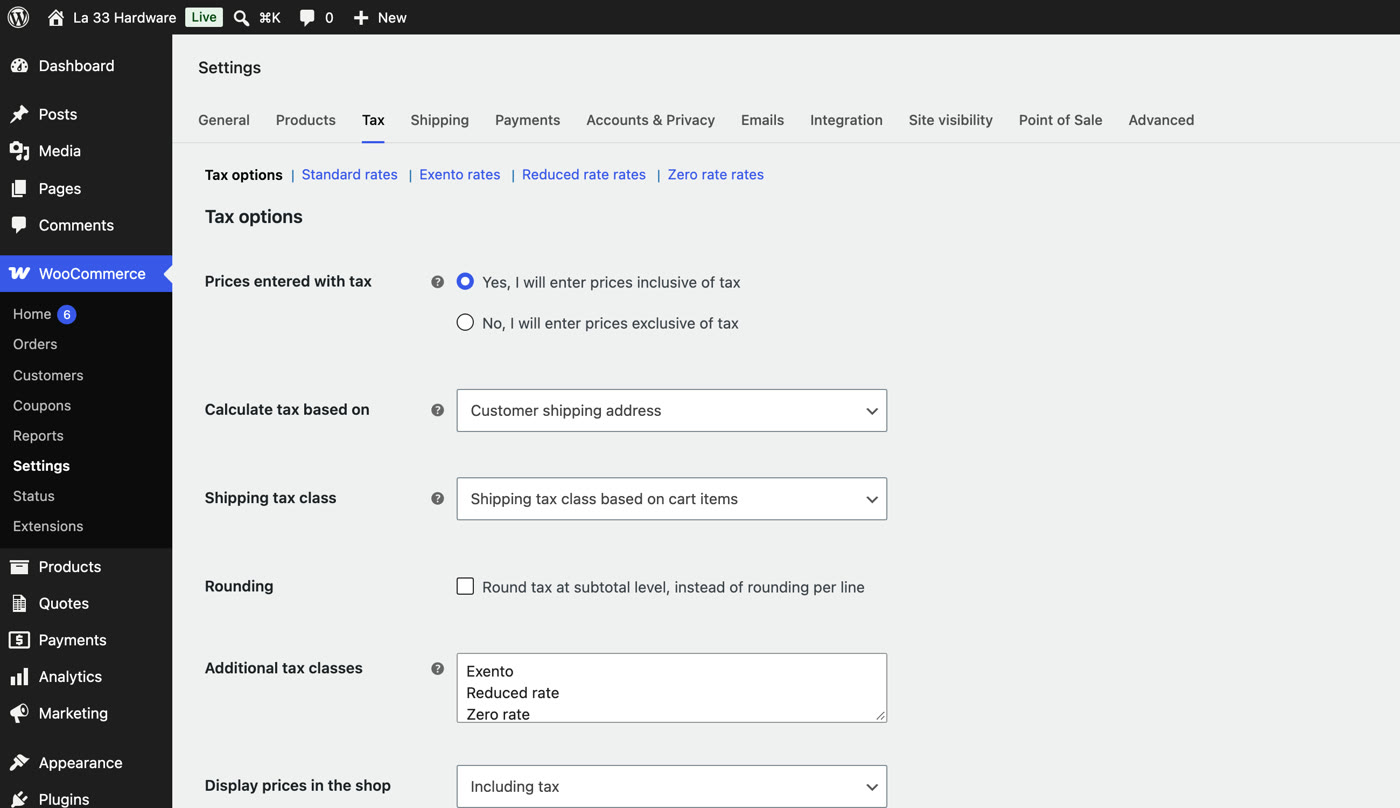
Koalab Quote has no taxes of its own: it uses WooCommerce's. Check WooCommerce → Settings → Tax:
- Display prices in the shop: with "Including tax", the quote shows the tax your prices contain (the usual with VAT in Latin America). With "Excluding tax", it adds the tax at the end.
- Rates: each product uses its tax class. Products with a zero rate are marked as exempt.
5. Build a quote
The "Create quote" button
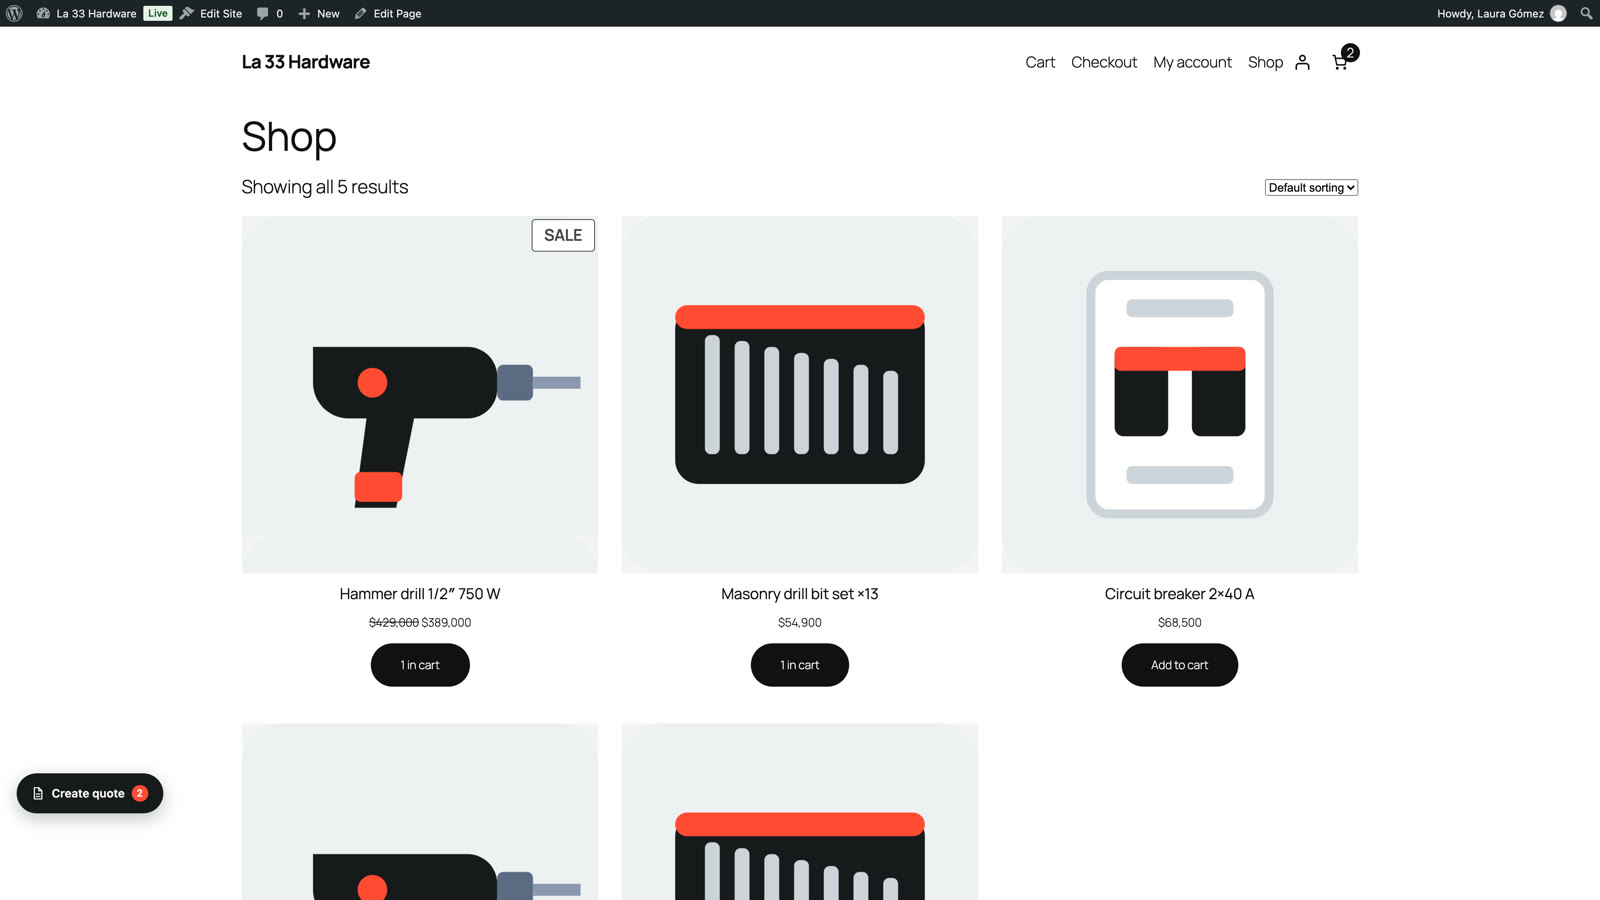
Open your store while logged in. At the bottom left you'll see the floating Create quote button: click it to open the quote panel. You can drag it somewhere else; to put it back, use Reset the "Create quote" button position at the end of the History tab.
Products
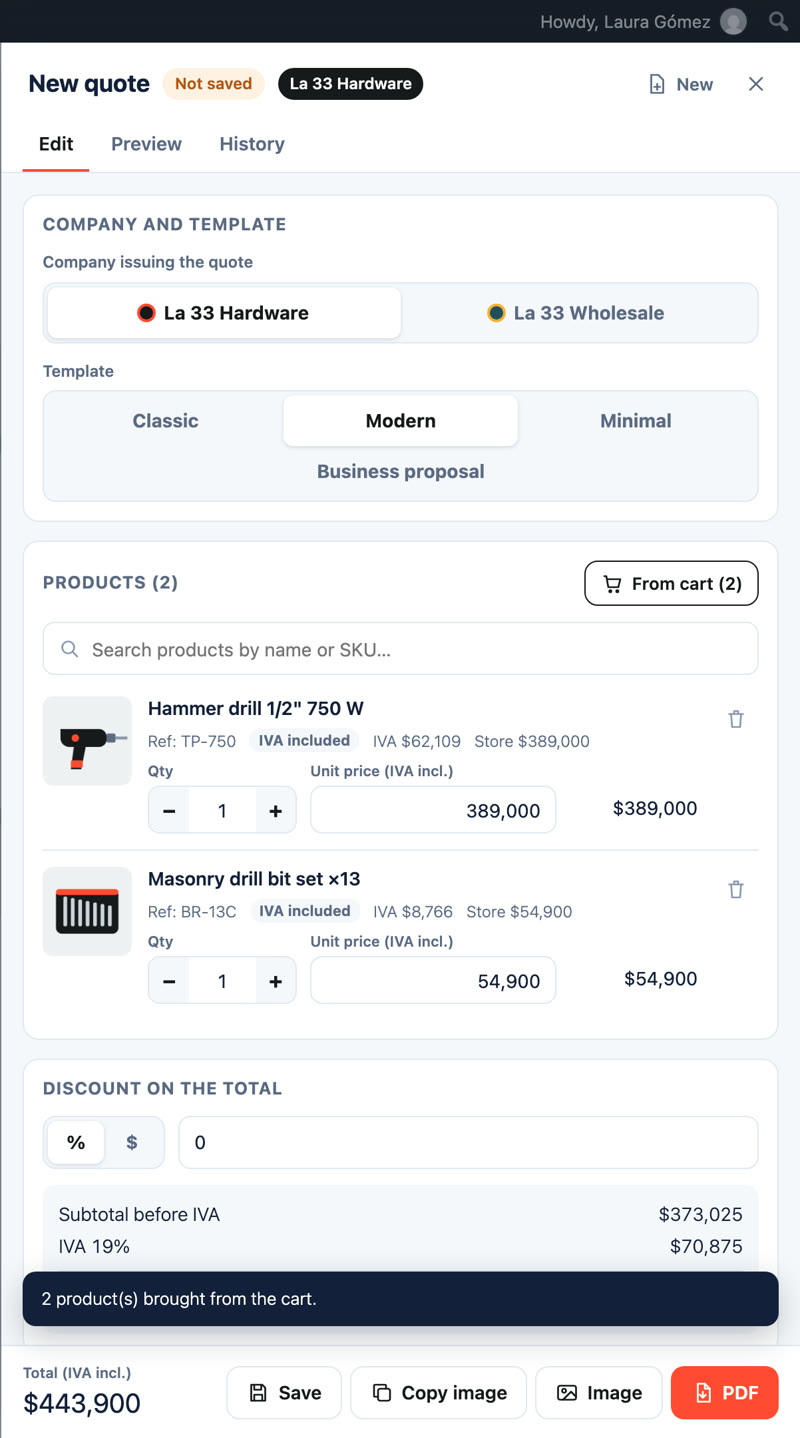
- From cart: add the products to the store cart, the way a customer would, and press From cart. The real cart doesn't change.
- Search: type the product name or SKU in the panel's search box.
- Set the quantity with the − and + buttons, and change the unit price if you agreed on a different one. Your store prices don't change.
- Each line shows its tax and the store price for reference. To remove a product, use the trash icon.
Discount, customer and terms
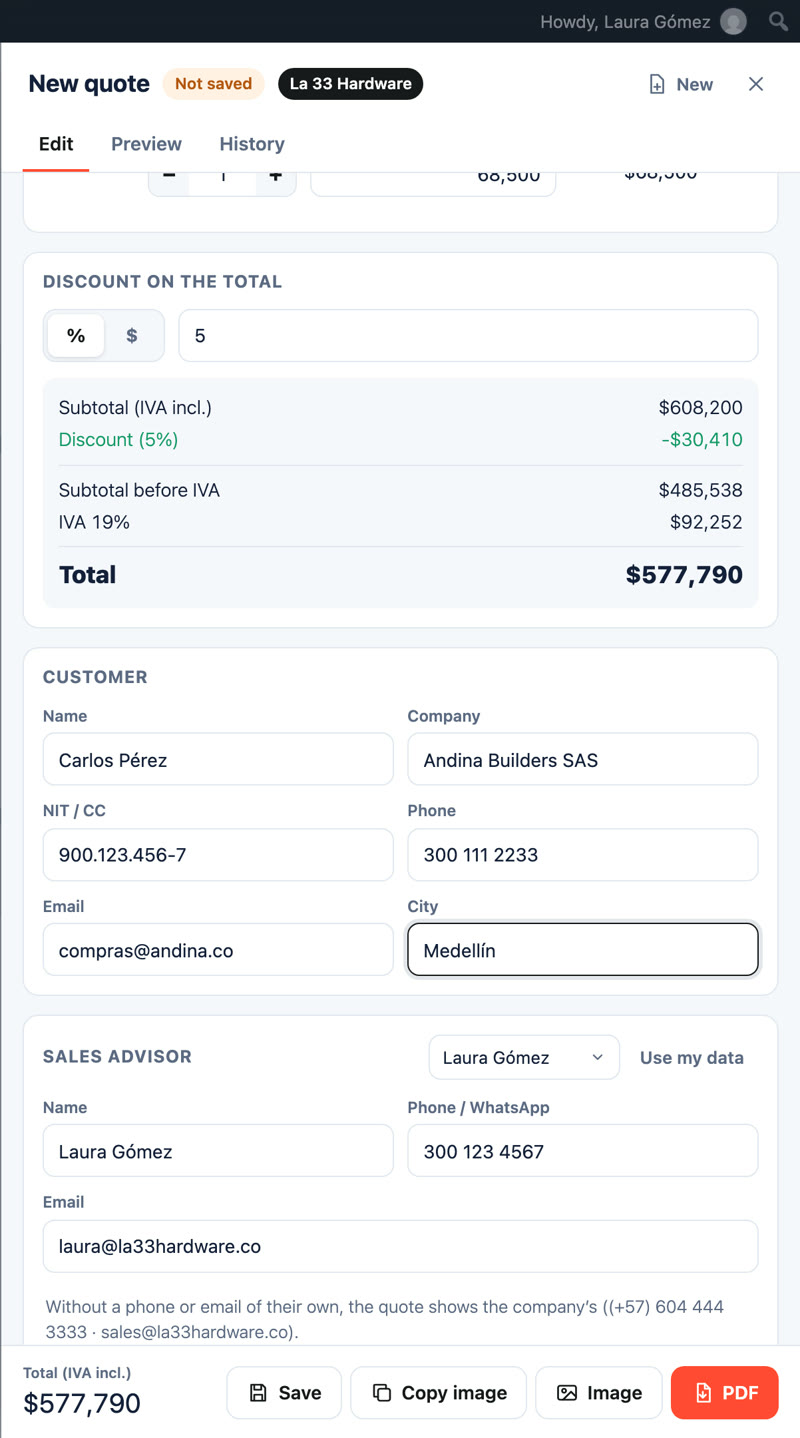
- Discount on the total: as a percentage (%) or an amount ($). Subtotal, tax and total update on their own.
- Customer: name, company, tax ID, phone, email and city. All optional for the PDF; the email is needed to send the link or create the order.
- Sales advisor: your details appear. You can change them for this quote only.
- Terms: validity in days, the terms of this quote, and whether images and the struck-through price are shown.
Save
Press Save. The quote gets its number (for example, QT-0412) and goes into your history. See how the document looks in the Preview tab.
6. Send the quote
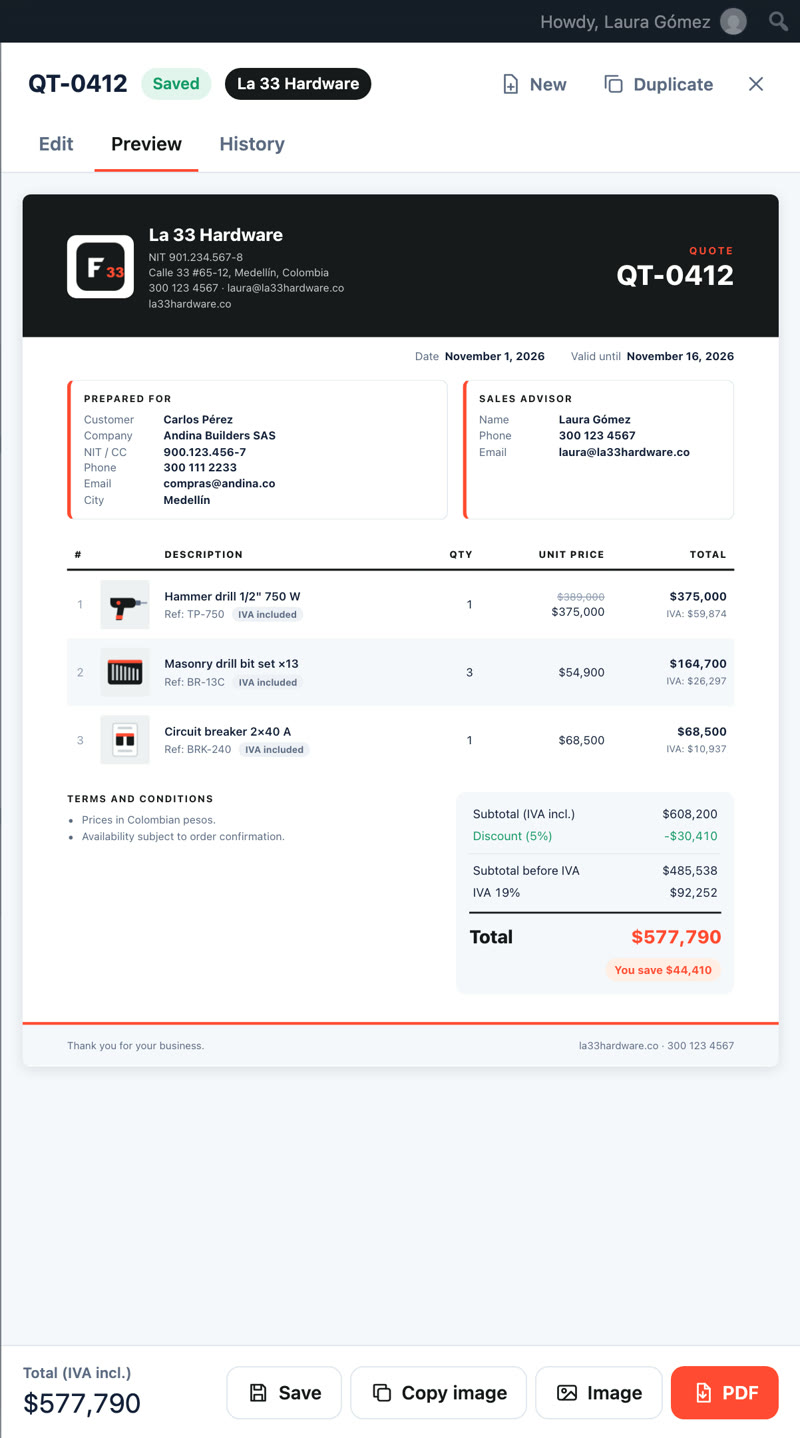
At the bottom of the panel there are three ways to get it out:
- PDF: downloads the document in Letter size, ready to send by email or WhatsApp.
- Image: downloads a PNG. On phones it opens the share sheet, so you send it straight to WhatsApp.
- Copy image: on a computer, copies the quote as an image to paste with Ctrl/Cmd + V in WhatsApp Web or an email.
The PDF and the image are generated in your browser: they never go through external servers.
7. History and saved quotes
- In the panel's History tab you search by number, customer or email, and open any quote to review or correct it.
- Duplicate makes a copy that gets a new number when saved. Handy to quote the same thing to another customer.
- New clears the panel to start another quote.
- In the dashboard, Quotes → All quotes lists them all, with Open in the panel and the trash.
8. Customer link and online acceptance Pro
Every saved quote has a private link where your customer sees it, downloads the PDF and accepts or declines it, with an optional comment. The page doesn't use your theme, isn't indexed by search engines and only shows what's already on the document.
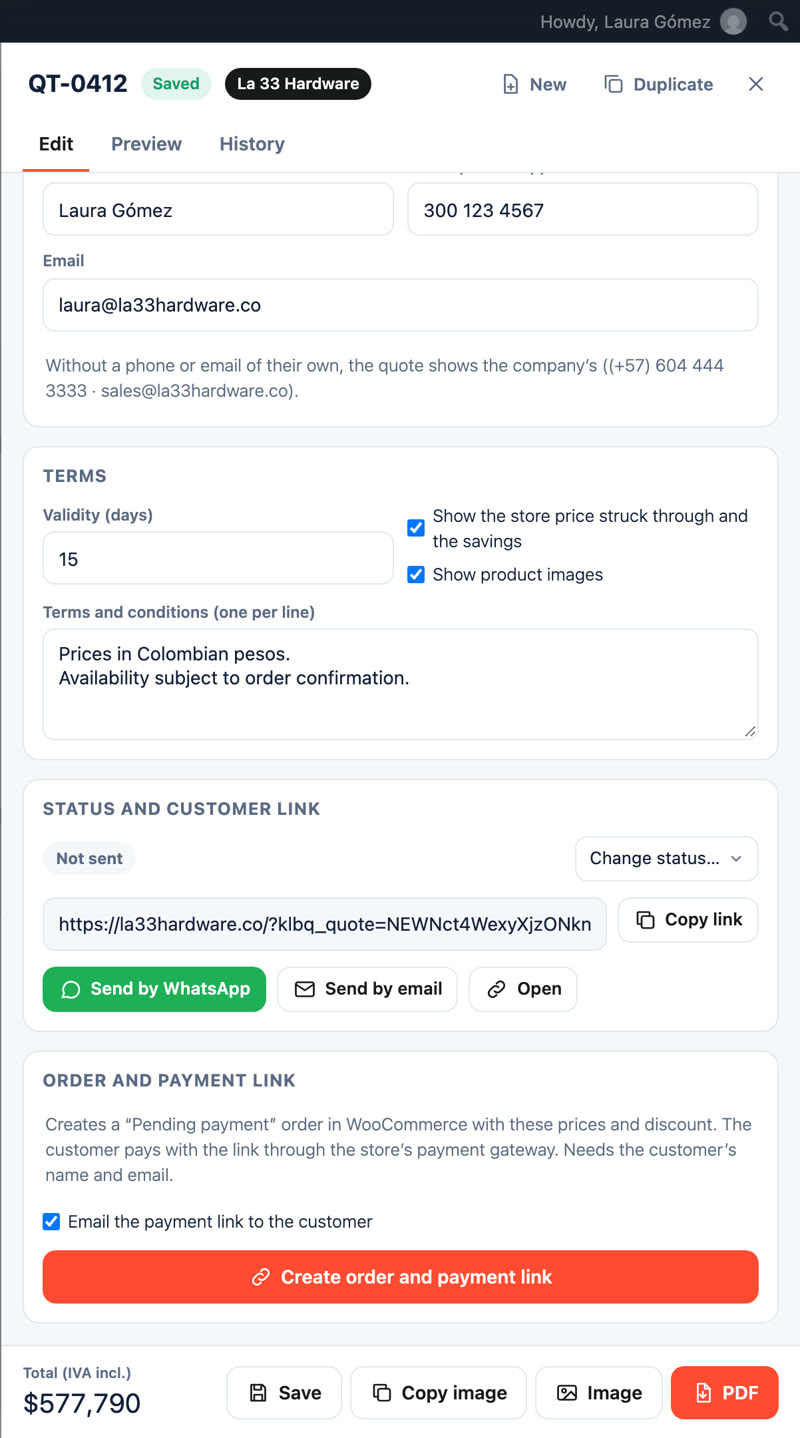
In the panel's Status and customer link section:
- Copy link, Send by WhatsApp (opens WhatsApp with a ready message), Send by email or Open to see it as your customer will.
- The status updates on its own: Not sent, Sent, Seen by the customer, Accepted, Declined, Order created or Expired. You can also change it by hand with Change status.
- If you change the total of a quote that was already accepted or declined, it goes back to "Not sent", since the customer answered for other numbers.
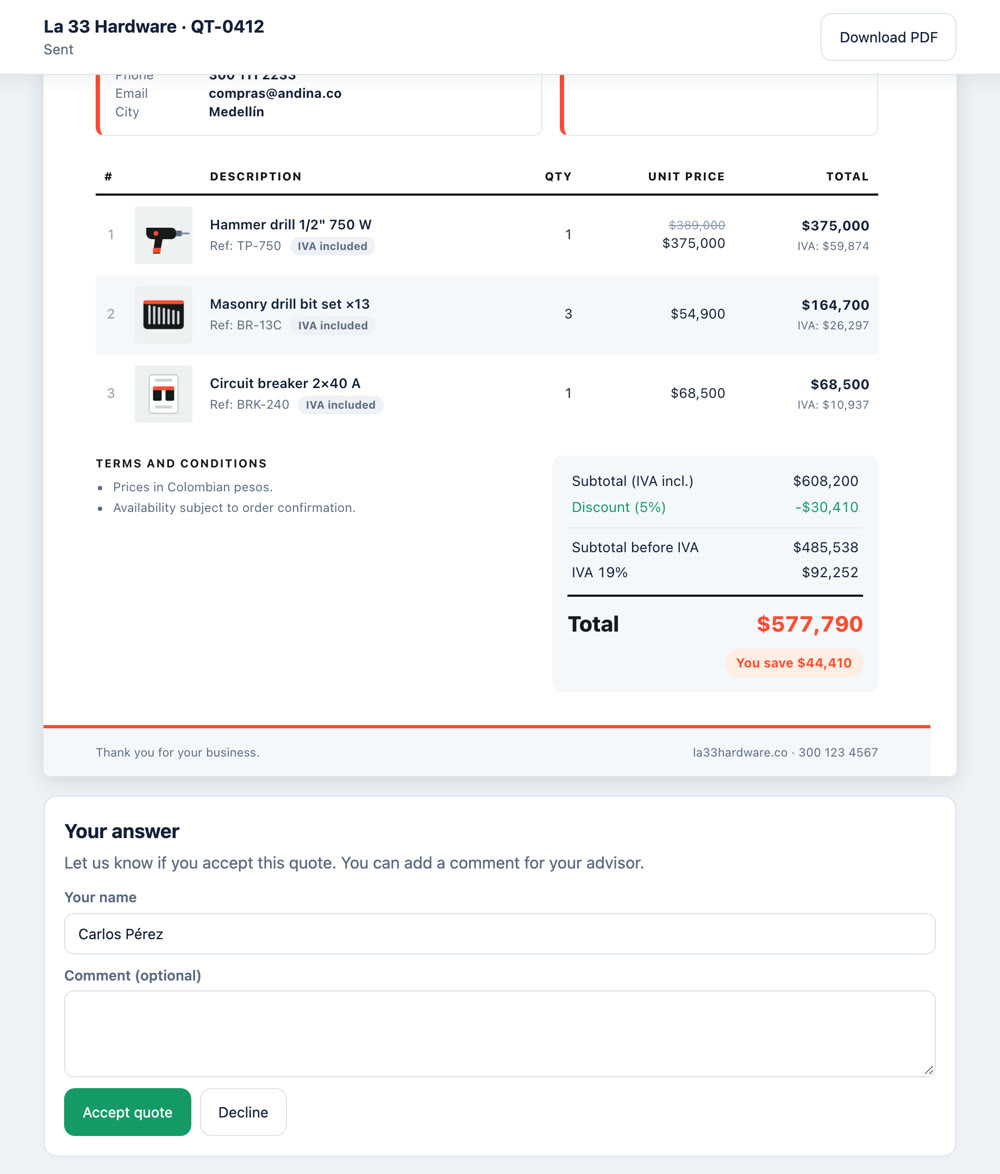
Under Quotes → Settings → Customer link and reminders you decide:
- When the customer accepts: just mark it as accepted and notify the advisor, or also create the order and take the customer to pay.
- Also notify: an email that gets every acceptance and decline, besides the advisor.
- Expiry reminders: an email to the advisor a few days before a sent quote expires without an answer. Optionally, to the customer too.
9. Order and payment link Pro
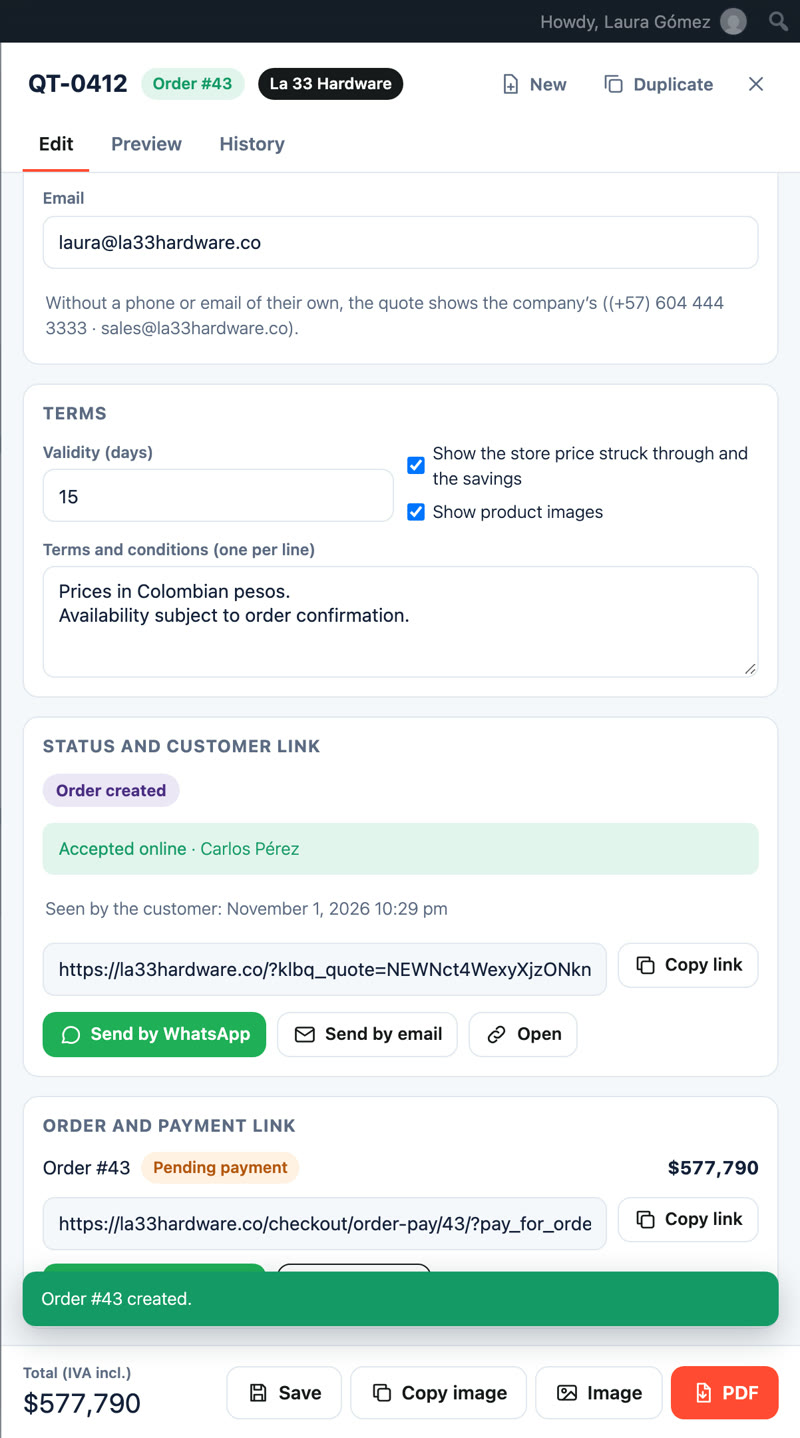
Create order and payment link turns the quote into a WooCommerce "Pending payment" order, with the same prices, discount and taxes.
- It needs the customer's name and a valid email.
- You can email the payment link to the customer, copy it or send it by WhatsApp.
- The customer pays with the payment methods your store already has.
- If you change the quote after creating the order, the order doesn't update itself: edit it in WooCommerce, or cancel it and create a new one.
10. Several brands Pro
If you sell under more than one company or brand (for example, your retail store and your wholesale business), add them under Settings → Company → Add brand. Each brand has its own name, tax ID, contact, logo, colors and template, and in the panel you pick which one each quote is issued under.
- Under Settings → General → Numbering choose one series for every brand or a separate series per brand, each with its own prefix.
- Pro includes up to 3 brands per site; Agency, unlimited brands.
11. Templates Pro
The free version includes the Classic template. Pro adds Modern and Minimal, and lets you create your own under Settings → Custom templates:
- Start from Classic, Modern or Minimal and adjust the typeface, logo size, spacing, corners, table header and striped rows.
- Choose what to show: line numbers, product reference (SKU), tax label on each line, sales advisor box and footer.
- Change the document title and closing text for that template only.
- The preview updates as you edit, with the colors and logo of the brand you choose.
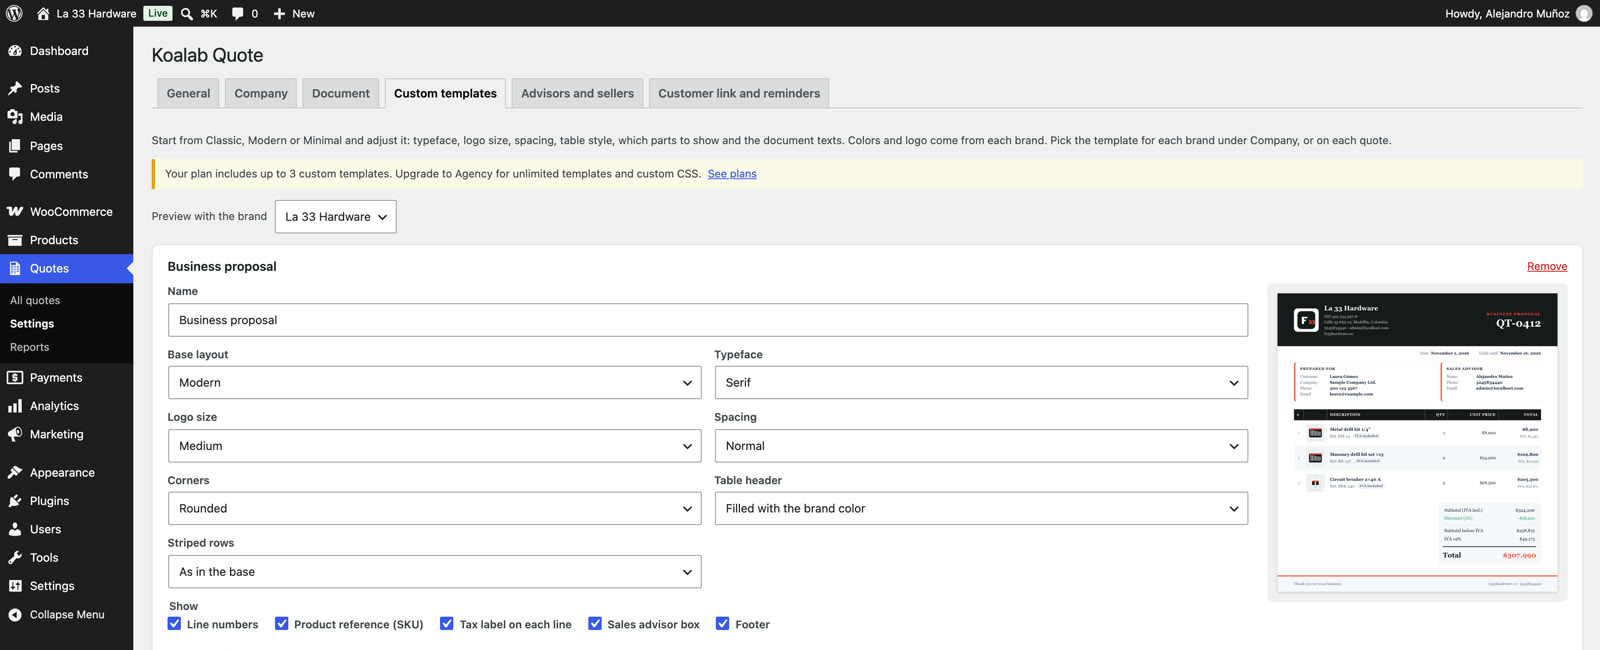
Pro includes up to 3 custom templates per site. With Agency they're unlimited and each one accepts custom CSS.
12. Advisors and external sellers Pro
Sales advisors
Under Settings → Advisors and sellers choose which user roles are listed as advisors (shop managers by default). On each quote you can pick the advisor, update their details or create a new one with Save as a new advisor. Their name, phone and email go on the document.
External sellers
For sellers outside your team, turn on External sellers. This adds the "External seller" role: create a user with that role under Users → Add New User and share its login with your sellers. With that account:
- They can only use the "Create quote" button: no dashboard, and they don't see each other's quotes.
- They quote at published prices, with the maximum discount you set (0% by default).
- On each quote they enter their own details, which appear as the advisor, and get a copy by email.
- Their quotes use their own prefix (for example, EXT-) and can only be corrected from the same browser tab, for the hours you set.
Your team sees all their quotes in the dashboard.
13. Reports Pro
Under Quotes → Reports filter by dates, brand and who made them, and see per advisor: quotes, amount quoted, accepted, orders, paid orders, amount paid and conversion (paid orders ÷ quotes). Export CSV downloads the quotes in the range to work on them in Excel or Google Sheets.

14. White label Agency
Under Settings → White label change the plugin name, menu label, author, author URL and description shown in the dashboard and the plugin list. Quotes never carry the Koalab brand, on any plan: they always carry the store's brand.
15. Templates in code Agency
For developers. Register the template's name with the klbq_templates filter and its layout in JavaScript as KoalabQuoteDoc.templates['my-template'], in a script that depends on klbq-templates:
add_filter( 'klbq_templates', function ( $templates ) {
	$templates['my-template'] = 'My template';
	return $templates;
} );

add_action( 'klbq_enqueue_panel', function () {
	wp_enqueue_script( 'my-template', plugins_url( 'my-template.js', __FILE__ ), array( 'klbq-templates' ), '1.0', true );
} );

// So the customer link draws it too:
add_filter( 'klbq_doc_script_handles', function ( $handles ) {
	$handles[] = 'my-template';
	return $handles;
} );
KoalabQuoteDoc.templates['my-template'] = function ( vm, U ) {
// vm: the quote ready to print. U: shared pieces
// (U.h, U.itemsTable, U.totalsBlock…) used by the bundled templates.
return U.h( 'div', null, /* … */ );
};If your template has its own stylesheet, add it with the klbq_doc_style_handles filter.
16. Troubleshooting
I can't see the "Create quote" button
- Open the store logged in as an administrator or shop manager; other roles don't get it.
- Make sure WooCommerce is active.
- If you use a cache plugin, clear it once. Logged-in users don't get cached pages, so there's nothing to exclude.
The taxes aren't what I expected
- Check WooCommerce → Settings → Tax: whether prices are shown including or excluding tax, and the rate of each product's tax class.
- Remember that the rate for your store's location is used (see Taxes).
Emails don't arrive
Notices, links and reminders are sent with your WordPress email. If they don't arrive, set up an SMTP plugin (for example, with your domain's email) and check the spam folder.
The customer can't open the link
Make sure the customer link is turned on in the settings and the quote isn't in the trash. If the quote expired, the customer sees a notice to ask you for an updated one.
17. Need help?
- With a paid license: write to support@koalab.tech or on WhatsApp, on Colombian business days.
- Free version: on the WordPress.org support forum.